
Accounts payable payment Processing
|
Check Printing |
Last Revised: 02/21/14 |
The Check Printing program uses information you have entered in Payment Selection and Payment Selection Maintenance to process and print vendor checks.
If Dynamo Check Printing is being used for the first time:
- Establish your check format in A/P Parameter Maintenance on the APU menu.
- Establish your check stub type (also called Remittance Advice Attachment) in A/P Parameter Maintenance on the APU menu. (See "Check Stub Type" below for an explanation of types.)
- Establish your Bank information in Bank Code Maintenance on the APU menu.
Before checks are printed each time:
- Review the Payment Selection Register for accuracy.
- Load the printer with blank check forms, noting the next check number. Verify this check number with the system's check number during check printing.
To order checks, follow the Guidelines for Order Dynamo Accounts Payable Checks.
TO PROCEED WITH CHECK PRINTING, SELECT ONE OF THE FOLLOWING OPTIONS:
1. Print checks for a specific batch
2. Re-print check from updated batch that was lost or damaged
Printing Checks for a Specific Batch
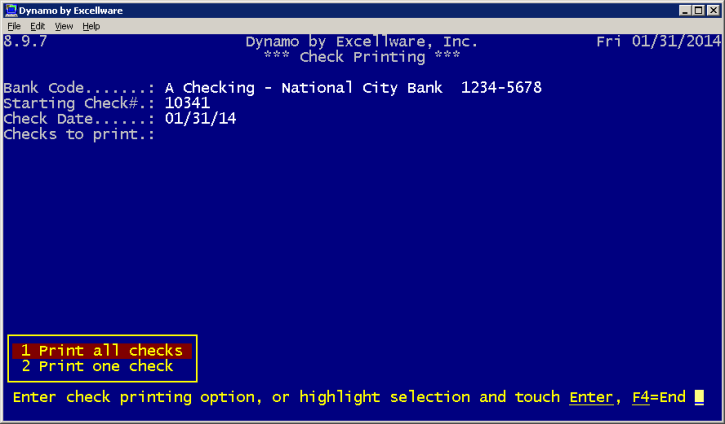
This allows you to print a SINGLE check from a batch or ALL checks in a specific batch. All open payment batches will display. Select a payment batch for check printing.
- Bank Code:
Bank codes must have been previously set up in Bank Code Maintenance on the APU menu; if not, a prompt will be displayed indicating there are no valid entries. - Starting Check #:
The next unused check number will be displayed, but you can override this number if necessary. As verification that the displayed check number is correct, look at the next blank check form to see that the pre-printed check number matches the starting check number shown on the screen. - Check Date:
This is the date that will print on the checks regardless of when they are actually printed. This defaults to today's date but can be overridden to any date within the next 30 days.
After the entries above are completed, your options are to:
- Print all checks in this payment batch
- Print one check in this payment batch
The following additional options may also display if some of the checks in the batch have already been printed:
- Reprint one check
- Reprint from operator selected check to end of the batch
- Print all Remittance Advice Attachments
- Print one check scheduled to be printed
Each vendor name will quickly display at the bottom of the screen as check printing instructions are being sent to the printer.
At the completion of check printing, you will be given the opportunity to reprint any checks that may have been damaged during the printing process. Your options are to:
- Reprint all checks (displays if batch contains multiple checks)
- Reprint one check
- Reprint from operator-selected check to the end of the batch
- Print all Remittance Advice Attachments (displays if applicable)
If a batch of checks contains any single-character vendors such as M for Miscellaneous, the Payee names will also display.
Reprinting a Check from an Updated Batch That Was Lost or Damaged
This option allows you to re-print a check that was already issued. Upon entering the vendor, checks issued to that vendor will display. Once a check is selected, the original check number and check amount will display in the respective fields.
- Starting Check #
(automatically displays) - Check Date
(defaults to current date) - Vendor
Enter the vendor alpha sort name, a contact name, phone number, or zip code. Upon entering a vendor, a list of checks issued to this vendor will display. (If a single-character vendor is entered, such as M for Miscellaneous, then the Payee names will be listed from which you can choose.) Once you have selected one of these checks, the next two fields will automatically display. - Original Check #
The pre-printed number of the original check. - Check Amount
The dollar amount of the original check.
How to Print a Single Check
There are several ways to Print a Single Check:
1. Manual Payment Entry on the APP menu is the easiest way to print a quick, computer-generated check or to record entries for a check that was handwritten. A single check can be issued immediately for an invoice that was already entered in the system or a new invoice. For further details, refer to Manual Payment Entry documentation. Manual Payment Entry is the most direct way to print a single check.
2. If the invoice has already been entered in the system but has not been selected for a payment batch, it will be listed on the Invoice Register but not the Payment Selection Register. In this case, go to Payment Selection (APP menu). Start a new payment batch and enter the selected vendor. Proceed with Check Printing.
3. If the invoice has been entered in a batch and has been selected for payment, it will be listed on the Payment Selection Register. Go to Check Printing, select the payment batch containing that invoice, and choose the option to PRINT ONE CHECK.
Check Stubs
The check form required no pre-printing on the stub because both the headings and corresponding information will be printed by the computer:
- Customer Number (the vendor refers to you by this number)
- Check Number
- Date
- Vendor Number
- Vendor Name
- Check Issued By (your company name)
- Invoice Number
- Invoice Date
- Payment Amount
The following will also display on the check stub if applicable:
- Note (Any comment entered during Invoice Data Entry or Invoice Maintenance)
- Invoice Amount (This will display only when the invoice amount and payment amount differ.)
- Discount
The check stub format that will print on your check form may vary from check to check, depending on the information that is applicable to that check. The system will automatically "customize" the check stub format to include any of the three variables listed above (Note, Invoice Amount, Discount).
Invoices print on the check stub and remittance advice attachment in invoice number sequence.
Check Stub Type
Typically a vendor is issued one check for multiple invoices. A normal check stub can list up to 39 invoices.
Note: a stub may not be able to accommodate 39 if variable information such as Note, Discount, and Invoice Amount is applicable.
Checks with more than 39 invoices will print an extended stub in one of two ways:
- Void the first check and use its stub to list the additional invoices - or -
- Print a Remittance Advice Attachment (a full-page extended stub) which eliminates the need to void any check forms.
To establish your preference for accommodating a large number of invoices for a check, go to A/P Parameter Maintenance on the APU menu (Check Formatting - Remittance Advice Attachment):
Enter Y (yes) to have a full-page remittance advice attachment print. After the checks print, you will be prompted to insert plain sheets of paper in the printer on which the attachment will print. Remittance advice attachments requiring multiple pages will print page numbers at the bottom.
OR
Enter N (no) to void the first check form and use its stub.
Sample Check.