GETTING STARTED
|
UPS Worldship Setup |
Last Revised: 02/08/20 |
UPS Worldship is a program provided by UPS that runs on a PC and is used to compute shipping charges, assign UPS tracking numbers, and print shipping labels. Worldship can communicate with Dynamo to obtain the shipping address, type of service desired, i.e., Ground, Three-Day-Select, 2nd Day Air, etc., and billing options, i.e., Bill Shipper, Bill Receiver, or Bill Third Party. Worldship can also report back to Dynamo tracking numbers and shipping charges.
For best results, each PC should have a bar code scanner, scale, and label printer. Higher volume shippers that use multiple PC's with UPS Worldship installed, can share the printer if the PC's are close together. Although Excellware does sell and support compatible PC's, bar code scanners, scales, and label printers, most customers purchase this equipment directly from UPS as UPS has a technology program where they provide this equipment at reduced or even no cost, depending on your annual UPS volume. Click here for more information.
When using multiple PC's with UPS Worldship, one is installed as the Administrative Workstation, and the others are called Remote Workstations. Refer to the UPS Worldship Installation Guide for details.
PC Setup
Follow these steps to enable UPS Worldship software to communicate with Dynamo.
- Check to see if java is installed
- Open a Windows command prompt (Windows Button, Enter: CMD, Enter)
- Enter:
java -version - If java has been installed, then the version will display, otherwise follow the steps below to install java.
- Type
EXITto close the Windows Command Window
- Install java if necessary
- Click this link to access the java download page: https://adoptopenjdk.net/
- Select Version 'OpenJDK 8 (LTS)' and the 'HotSpot' JVM.
- Download and install
- Install the Basis ODBC Driver
- Click this link to access the Basis download page https://www.basis.com/download-product
- Select ODBC from the Product List
- Enter your contact information, check the Download Terms check boxes, and click Download
- Download and install
- Configure the Basis ODBC Driver
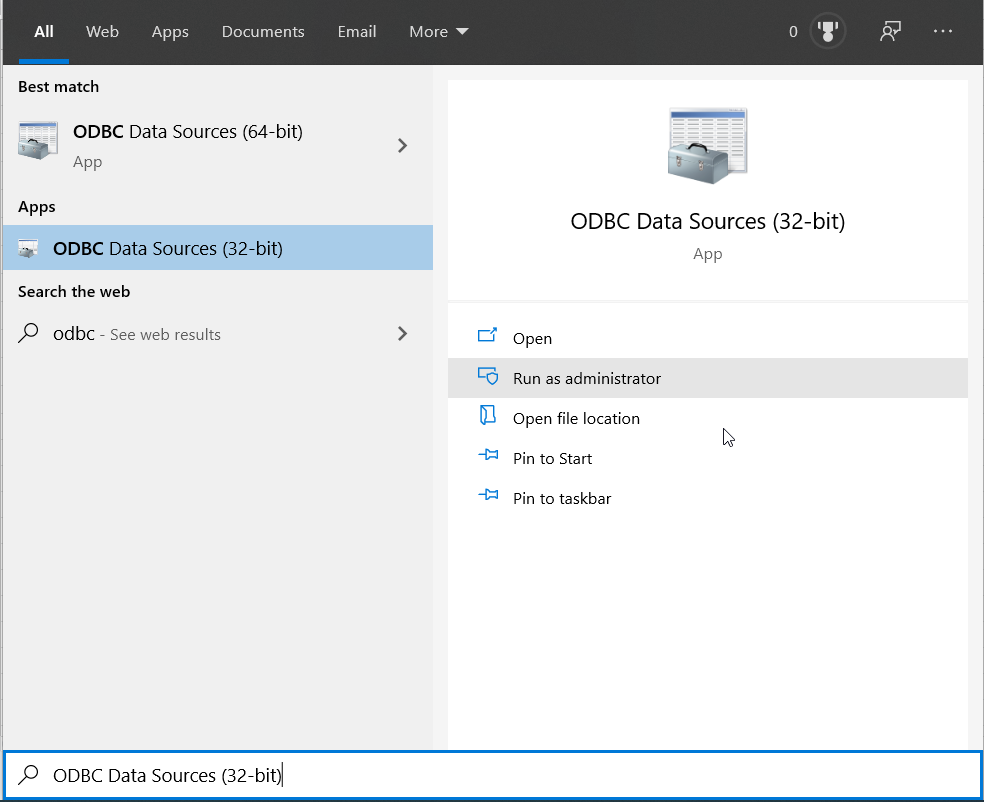
- Launch the Windows ODBC Data Sources (32-bit) App (Windows Button, Enter: ODBC, select the 32-bit app, Run as administrator. On older Windows versions you may need to right click on the App, then click Run as administrator).
- Click on the System DSN tab, then the Add button:

- Select the BBj ODBC Driver, then the Finish button
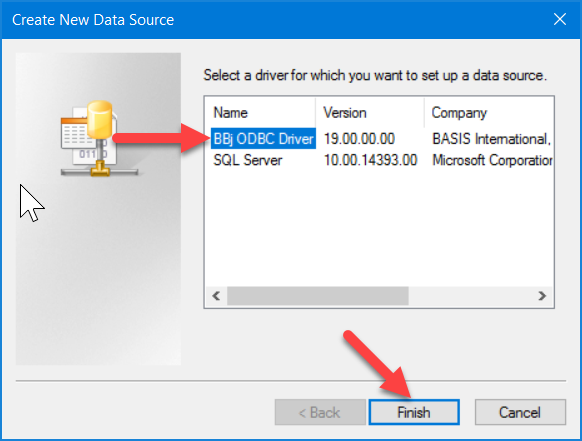
- Enter Dynamo in the Name, Description, and Database fields.
- Excellware will provide the entry for the Server field, but it is typically something like dynamo1.excellware.com. It is typically the same name that was used to install the Dynamo desktop icon.
- Leave all of the other fields empty or with the default values, then click OK.

- You should now see a Dynamo entry in the System DSN List.
- Click OK

Dynamo Server Setup
Excellware typically performs the server setup.
- Launch the Basis Enterprise Manager
- Login as admin
- Define the Dynamo database
- Double click Databases from the Databases/SQL menu on the left
- Enter /u/CDI/DY/bbdict in the Dictionary field
- Enter /u/CDI in the Data Location field
- Double click Users from the Security menu on the left
- Click the green Plus symbol to add a user named 'ups' with password 'ups'
- Define the Trigger
- Double click Triggers from the File system menu
- Click Mounted Directories then click the green plus and browse to and add folder /u/CDI/DY.
- Double click on the /u/CDI/DY folder to populate the list of files
- Double click on file DYSW81 to open the trigger configuration page
- Expand the General Trigger Settings section and set the enabled property to true
- Expand the Write Trigger Settings section and set the 'Instead of' property to true, and the 'Instead of Program' to /u/CDI/DY/bbj/SW081
- Save the Trigger configuration
- Close the Enterprise Manager
Network Setup
Excellware typically performs the network setup.
- Open TCP Port 2001 from IP Address of Dynamo User's office to the Dynamo server
- Do not open port 2001 from all Source IP Addresses
UPS Worldship Configuration
- Install UPS Worldship on the PC. Download link can be found here.
- Configure Worldship to obtain data from Dynamo
- Automated Configuration
- Launch Dynamo
- Click About, then BBj Console Mode. If the BBj Console Mode option is not available, then the user is not authorized for Console Mode.
RUN "UPSWorldship.bbj"- This program will copy the "From Dynamo" and "To Dynamo" mapping files to the PC. It will display messages reporting success or failure.
- Enter
BYEto close the BBj Console Window. - If successful, then the two manual configuration steps below are not required, although you can still view and verify the Map.
- Configure Worldship to obtain data from Dynamo - Manual Configuration
- Launch Worldship
- Click Import-Export from menu
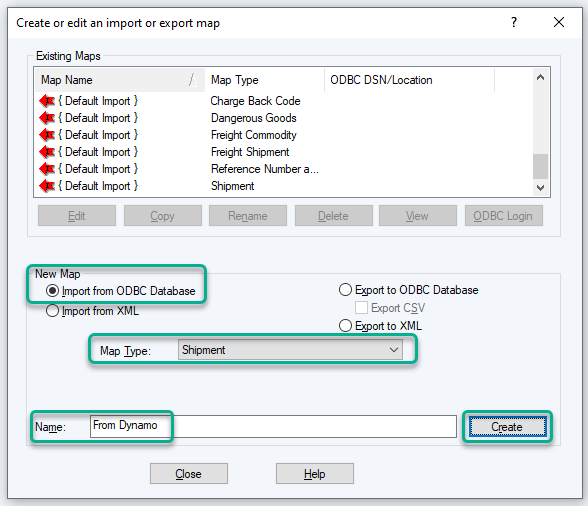
- Click Create/Edit Map
- Fill out the form as shown below:
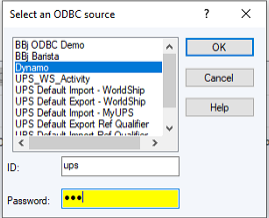
- Select Dynamo as ODBC Source
- Enter ups as ID and Password
- Click OK to Proceed
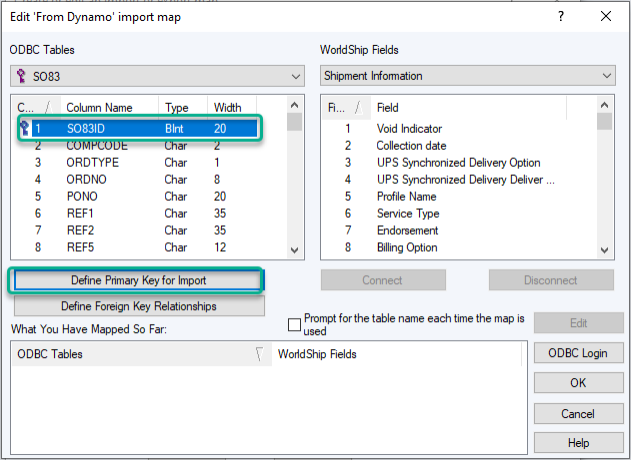
- Select the SO83 Table
- Define the Primary Key for Import by selecting SO83ID and clicking the button: Define Primary Key ID. You now see the image of a key next to SO83ID.
- Map the Dynamo fields to the UPS Worldship fields as shown below by selecting the Worldship Category from the drop down list, then the selecting the SO83 field and the WorldShip field name, then click the Connect button.
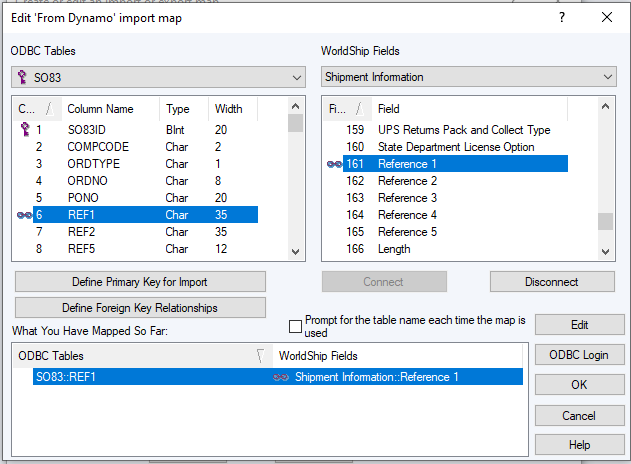
Worldship Category SO83 Field Name UPS Worldship Field Name Goods DESCOFGOODS Description Of Goods
Ship From SBNAME Company or Name SBATTENTION Attention SBADDR1 Address 1 SBADDR2 Address 2 SBADDR3 Address 3 SBCITY City or Town SBSTATE State/Province/County SBZIP Postal Code SBCOUNTRY Country/Territory SBPHONE Telephone SBACCTNO UPS Account Number Ship To S2NAME Company or Name S2ATTENTION Attention S2ADDR1 Address 1 S2ADDR2 Address 2 S2ADDR3 Address 3 S2CITY City or Town S2STATE State/Province/County S2ZIP Postal Code S2COUNTRY Country/Territory S2PHONE Telephone S2ACCTNO Receiver UPS Account Number S2RESIDENTIAL Residential Indictor Shipment Information BILLINGOPTION Billing Option REF1 Reference 1 REF2 Reference 2 REF3 Reference 3 SERVICE Service Type Third Party TPNAME Company or Name TPATTENTION Attention TPADDR1 Address 1 TPADDR2 Address 2 TPADDR3 Address 3 TPCITY City or Town TPSTATE State/Province/County TPZIP Postal Code TPCOUNTRY Country/Territory TPPHONE Telephone TPACCTNO UPS Account Number - Note that UPS uses the Country Name and not the Country Code field.
- Click OK when finished.
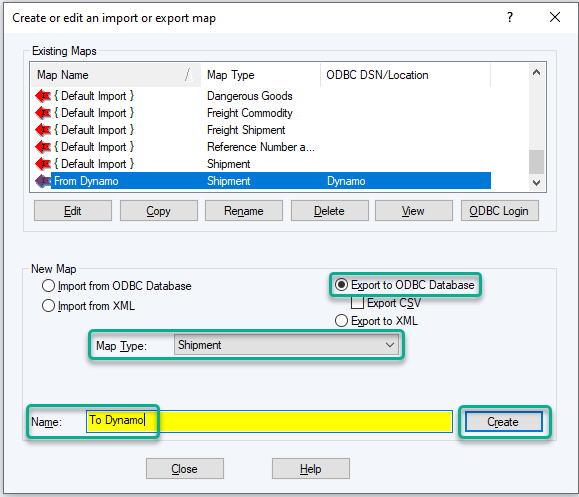
- Configure Worldship to send data back to Dynamo
- Fill out the form as shown below:
- Select Dynamo as ODBC Source
- Enter ups as ID and Password
- Click OK to Proceed

- Select the SW81 Table
- Map the Dynamo fields to the UPS Worldship fields as shown below by selecting the Worldship Category from the drop down list, then the selecting the SO83 field and the WorldShip field name, then click the Connect button. All 8 fields in the SW81 table should be linked to a UPS field when complete.

Worldship Category SW81 Field Name UPS Worldship Field Name Package VOID Void Indicator WEIGHT Weight TRACKINGNO Tracking No COST Package Reference Charge PRICE Package Published Charge Shipment Information SERVICE Service Type NOPKGS Number of Packages SO83ID Reference 5 - Close the Create/Edit Map window
See also Using UPS WorldShip.
