CONFIGURATION
|
UPS WorldShip ODBC Connection |
Last Revised: 07/14/15 |
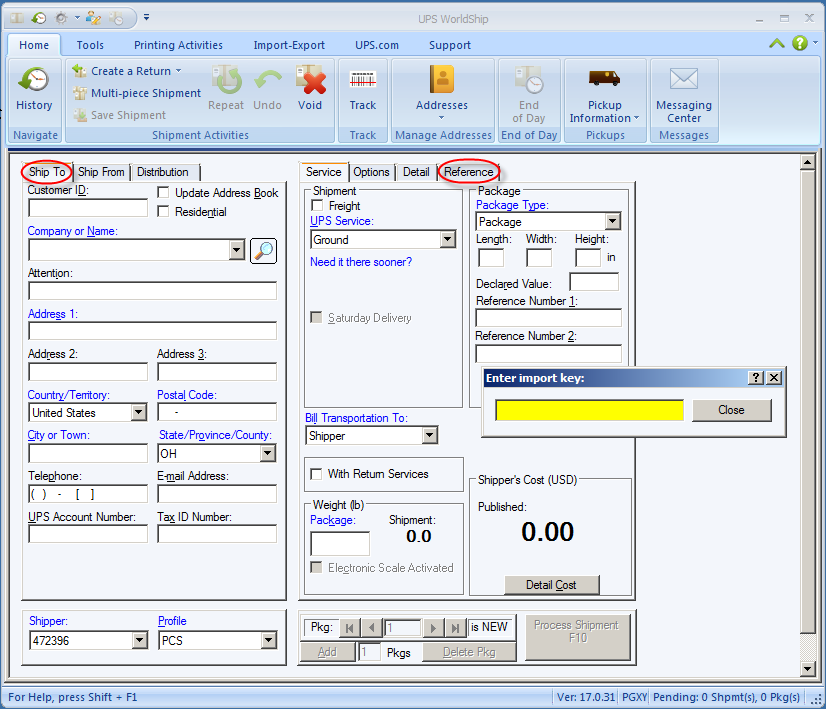
Dynamo can interface with UPS WorldShip. UPS WorldShip is a program provided by UPS that runs on a PC and is used to compute shipping charges, assign UPS tracking numbers, and print shipping labels. UPS can obtain theship to address, service (Ground, Next Day Air, Three Day Select, etc.), billing method (Shipper, Receiver, Third Party), and other information from Dynamo. UPS can also send to Dynamo package weights, tracking numbers, and shipping costs.
This document describes how to set up a BBj Open Database Connectivity (ODBC) interface so that UPS WorldShip and Dynamo have a place to exchange information with each other. The database will operate in the background as a key, or decoder, for communication between the two programs. If you have already completed the following steps, visit the UPS WorldShip documentation page to continue using WorldShip with Dynamo.
Has BBj ODBC driver been installed?
- Go to Windows Control Panel from the start menu
- Click on Administrative Tools
- Data Sources (ODBC) or ODBC Data Sources) (check both 32-bit and 64-bit).
- Drivers Tab
- Verify BBj ODBC Driver is at version 15.00.01.00
- If the driver is not installed, skip to the next session for instruction.

If the driver is not installed:
In a web browser, go to http://[SERVERNAME_OR_IP]:8888/install/installodbc.jnlp and press Enter. The file should run automatically upon download. Return to the above section to verify installation of the driver. Then proceed to the next section.
To Create Windows Data Source Name (DSN):
- In the same window as pictured above, click System DSN tab
- Click Add.
- Select BBj ODBC Driver.
- Click Finish.
- Fill out form using the following details:
- Name: Dynamo
- Description: Dynamo
- Server: typically just the word: server
- User Name & Password: leave blank so that it can vary by shipping software
- Database: Dynamo
- Click OK.
- These steps should be performed for both ODBC Data Sources 32-bit and 64-bit. However, since WorldShip is currently a 32-bit application, the 64-bit version of the DSN may need to be deleted later if connection to Dynamo times out.
To Configure BBj Database:
- Launch Basis Enterprise Manager from Browser: http://server:8888/bbjem/em
- Click on your server name in the left pane, then click on the blue link button immediately at the top of the left pane.
- In the pop-up window, enter admin as both the user name and password. See Customer Notepad in Dynamo or use default password which is the same as the customer's router configuration password.
- Double-click Users on the left side menu.
- If the ups user does not exist, then:
- Click the green + button (not the one on the left, but in the middle toward the top of the page)
- Enter username (with password same as username) of ups (for UPS), fdx (for Federal Express), usm (for US Mail using Endica)
- Double-click Databases on the left side menu (you may need to expand the list to see it)
- If the Dynamo database name is not listed, then:
- Click the green + button (again at the top, in the middle)
- Enter Database Name: Dynamo
- Action: Use an Existing Data Dictionary
- Dictionary Location: /u/CDI/DY/bbdict
- Data Location: /u/CDI
- Click OK
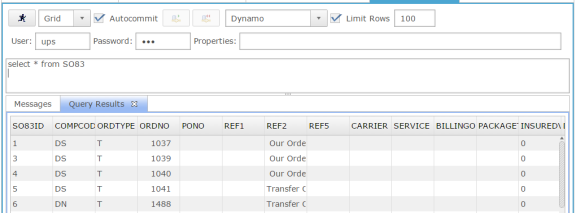
- To test if everything is in working order:
- Click on Open a connection for running SQL statements which is simply a running-man icon (toward top of window, in the middle)
- Enter a shipping login/password such ups/ups.
- In the large white box, type the following text: select * from SO83
- Click the running-man icon to execute (now at top left)
- You should see something like in the screen shot below if it is working. If not, please follow these steps from the beginning to be sure a step was not missed.
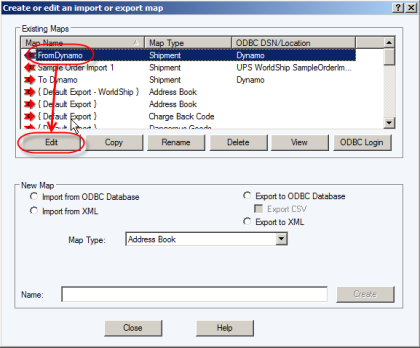
"From Dynamo" Configuration
The From Dynamo configuration, if it already exists, can be edited instead of deleting it. Editing the current configuration should take significantly less time than creating a new configuration after deleting the old one. However, if the From Dynamo map does not exist, it will need to be created using
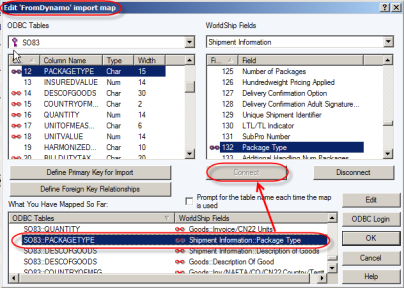
1. Some of the fields that will need to be changed include the following:
- Step 1 - Delete SO83::PACKAGETYPE Package::PackageType
- Step 2 - Recreate using same Field Name from Shipment Information WorldShip Field SO83::PACKAGETYPE
Shipment Information::PackageType
SO83::REF1
Shipment Information::Reference 1
SO83::REF2
Shipment Information::Reference 2
Remove SO83::SO83ID (Remove SO83ID and replace it with SO83::REF5)
Shipment Information::Reference 5 (Link to Reference 5 in Shipment Information section)
2. Other fields should already be mapped. The other mapped fields should include the following:
SO83::S2RESIDENTIAL
Ship To::Residential Indicator
SO83::S2ZIP
Ship To::Postal Code
3. Continue on for the remaining From Dynamo fields.
4. Click OK when finished.
Data Source Information:
DSN Name: Dynamo
DSN Description: Dynamo
ODBC Driver Name: BBj ODBC Driver
ODBC Driver: BBjODBC.dll
Database Name: Dynamo
Database Path:
Database Server: server
Map Information:
Map Type: Shipment
Map Version: 1017
Primary Table: SO83
Primary Key: SO83ID
Package Name:
Prompt for Table Name:No
XML Directory Location:
Field Mappings:
ODBC Data Source Field (Table::Field)
WorldShip Field (Container::Field)
SO83::PACKAGETYPE
Shipment Information::Package Type
SO83::DESCOFGOODS
Goods::Description Of Good
SO83::S2RESIDENTIAL
Ship To::Residential Indicator
SO83::TPACCTNO
Third Party::UPS Account Number
SO83::S2ZIP
Ship To::Postal Code
SO83::QUANTITY
Goods::Invoice/CN22 Units
SO83::SBZIP
Ship From::Postal Code
SO83::SBSTATE
Ship From::State/Province/County
SO83::S2ACCTNO
Ship To::Receiver UPS Account Number
SO83::S2STATE
Ship To::State/Province/County
SO83::REF1
Shipment Information::Reference 1
SO83::BILLDUTYTAX
Shipment Information::Bill Duty and Tax To
SO83::REF2
Shipment Information::Reference 2
SO83::TPCITY
Third Party::City or Town
SO83::TPATTENTION
Third Party::Attention
SO83::DESCOFGOODS
Shipment Information::Description of Goods
SO83::S2ADDR1
Ship To::Address 1
SO83::S2ATTENTION
Ship To::Attention
SO83::S2NAME
Ship To::Company or Name
SO83::SBACCTNO
Ship From::UPS Account Number
SO83::UNITVALUE
Goods::Invoice/EEI/CN22 Unit Price
SO83::TPZIP
Third Party::Postal Code
SO83::TPADDR1
Third Party::Address 1
SO83::S2ADDR2
Ship To::Address 2
SO83::SERVICE
Shipment Information::Service Type
SO83::TPADDR2
Third Party::Address 2
SO83::S2ADDR3
Ship To::Address 3
SO83::SO83ID
Shipment Information::Reference 5
SO83::TPPHONE
Third Party::Telephone
SO83::TPADDR3
Third Party::Address 3
SO83::SBNAME
Ship From::Company or Name
SO83::S2EMAIL
Ship To::Email Address
SO83::S2PHONENO
Ship To::Telephone
SO83::S2COUNTRY
Ship To::Country/Territory
SO83::S2CITY
Ship To::City or Town
SO83::UNITOFMEASURE
Goods::Invoice/CN22 Unit Of Measure
SO83::TPCOUNTRY
Third Party::Country/Territory
SO83::TPNAME
Third Party::Company or Name
SO83::TPSTATE
Third Party::State/Province/County
SO83::SBCITY
Ship From::City or Town
SO83::SBATTENTION
Ship From::Attention
SO83::BILLINGOPTION
Shipment Information::Billing Option
SO83::SBADDR1
Ship From::Address 1
SO83::SBCOUNTRY
Ship From::Country/Territory
SO83::SBADDR2
Ship From::Address 2
SO83::COUNTRYOFMFG
Goods::Inv/NAFTA/CO/CN22 Country/Territory Of Origin
SO83::SBPHONE
Ship From::Telephone
SO83::SBADDR3
Ship From::Address 3
"To Dynamo" Configuration
- Now we need to remove the existing map named To Dynamo .
- Select the map named To Dynamo and then click the Delete button.
- Now we need to create a new map named To Dynamo.
- At the bottom section of the Create or Edit An Import/Export Map window, select the radio button next to Export to ODBC Database. Leave the CSV option below it blank. Change the Map Type to Shipment by clicking the drop arrow and selecting Shipment from the choices. Type To Dynamo in the Name field and click the Create button.
- A window titled "Select an ODBC source" appears. Select Dynamo as the source and click OK.
- Now we need to link the fields in SW81 to WorldShip Fields named Shipment Information, and Package.
- Click the drop arrow in the left ODBC Tables and select SW81.
- Click the drop arrow in the right WorldShip Fields and select Shipment Information.
- Click the ODBC Tables Column Names listed below and 'Connect' them to their associated Shipment Information Field names (listed below)
- Click on the Table name on left, click the WorldShip Field on the right, then click Connect. The pairing will be added to the mapped list at the bottom of the active window.
- Continue mapping each field as noted under Shipment Information. Then select the WorldShip Field named Package and map the remaining SW81 fields that are in the Package Field.
- Click OK when finished.
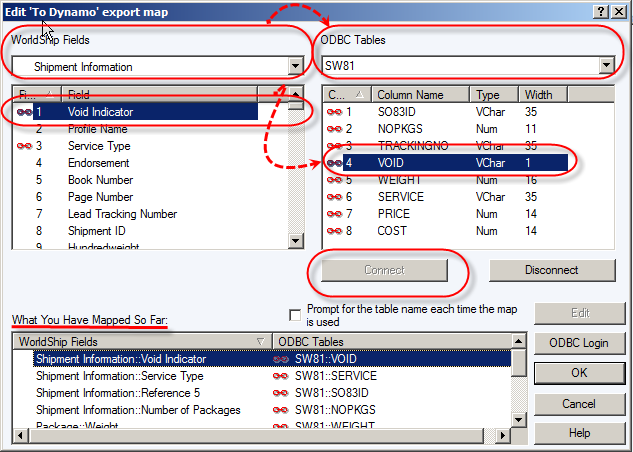
12. Create the following Field Mappings:
Shipment Information::Void Indicator
SW81::VOID
Shipment Information::Service Type
SW81::SERVICE
Package::Tracking Number
SW81::TRACKINGNO
Continue entering the remaining map pairings.
Data Source Information:
DSN Name: Dynamo
DSN Description: Dynamo
ODBC Driver Name: BBj ODBC Driver
ODBC Driver: BBjODBC.dll
Database Name: Dynamo
Database Path:
Database Server: server
Map Information:
Map Type: Shipment
Map Version: 1017
Primary Table:
Primary Key:
Package Name:
Prompt for Table Name: No
XML Directory Location:
Field Mappings:
WorldShip Field (Container::Field)
ODBC Data Source Field (Table::Field)
Shipment Information::Void Indicator
SW81::VOID
Shipment Information::Service Type
SW81::SERVICE
Package::Tracking Number
SW81::TRACKINGNO
Package::Postal Service Tracking ID
SW81::TRACKINGNO
Shipment Information::Number of Packages
SW81::NOPKGS
Package::Weight
SW81::WEIGHT
Package::Package Reference Charge
SW81::COST
Shipment Information::Reference 5
SW81::SO83ID
Package::Package Published Charge
SW81::PRICE
Changing ODBC Login
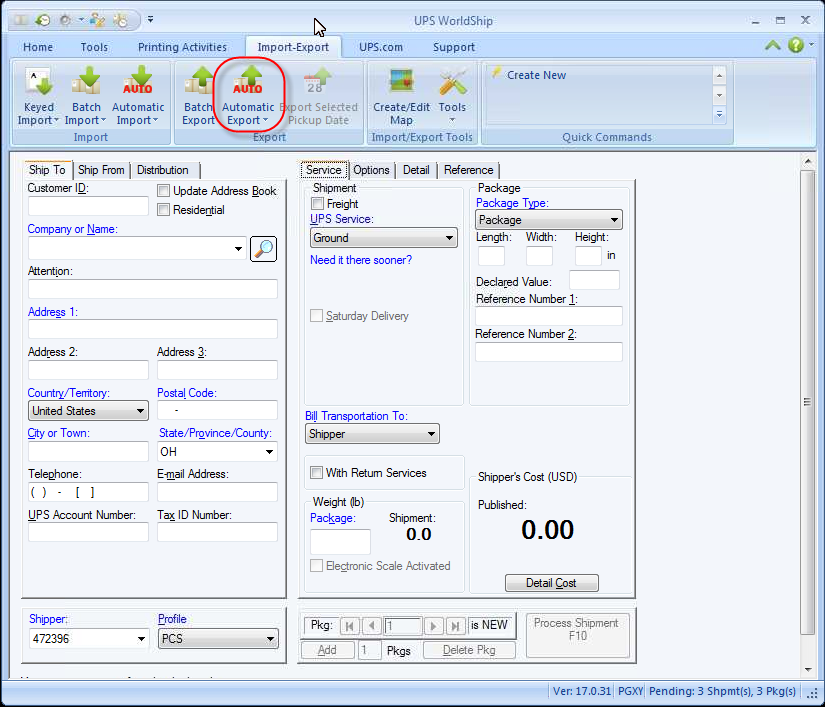
1. Now that the ODBC driver has been configured, start the UPS WorldShip software and click on the Import/Export tab.
2. Click Create/Edit Map.

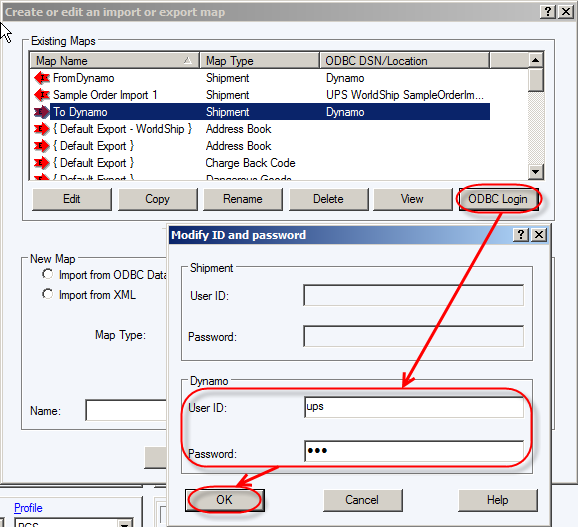
3. Click ODBC Login button and enter a username and password combination:
ups/ups (for UPS)
fdx/fdx (for FedEx)
usm/usm (for U.S. Mail)
Click OK when finished.
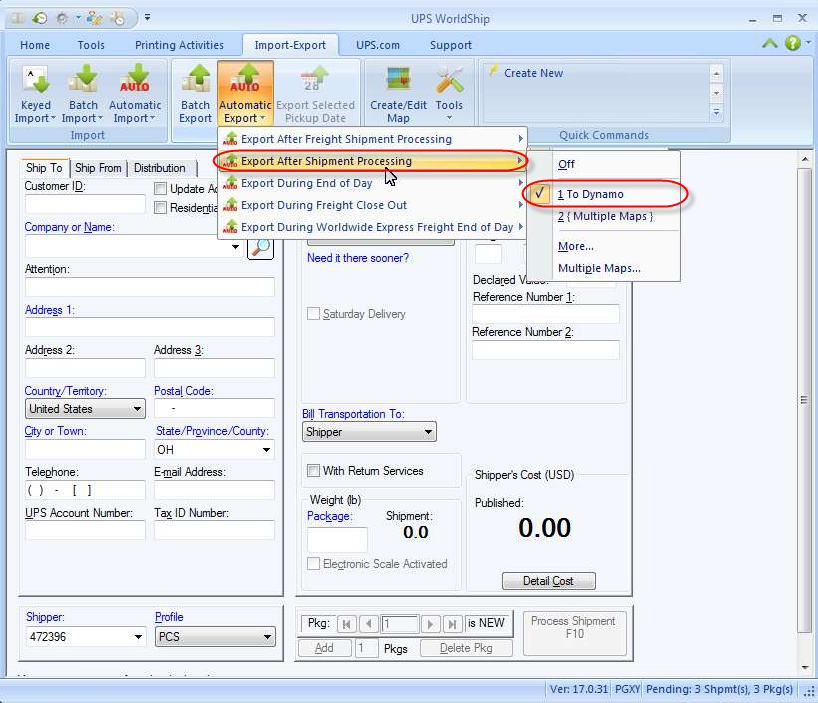
4. Click Automatic Export, then hover your cursor over "Export After Shipment Processing." Select "To Dynamo."
5. Click Keyed Import and select Dynamo
A yellow box should appear where you can scan or type a document number associated with a shipment.

6. Details from Ship To and Reference should be populated.