
Dynamo
|
Data Entry Conventions |
Last Revised: 12/27/17 |
Dynamo uses a single data entry routine for all of its applications to ensure a consistent data entry format throughout the program. Additionally, nearly every screen in Dynamo has a message area at the bottom, with data entry instructions or other important information related to the current screen. This area can serve as an invaluable, on-the-fly tutorial while getting acquainted with Dynamo.
Dynamo works best using a standard PC keyboard with 12 function (F) keys at the top, 6 editing keys (Insert, Delete, Home, End, PageUp & PageDn), and 4 arrow keys (↓, ↑, ← and →). For keyboards that do not have all of these keys, a new one with these keys can be purchased very inexpensively. Otherwise, you can frequently accomplish the same function by holding down the Ctrl key while touching another key. A list of these alternate methods are listed in the table below.
Note: On modern laptops, the Function keys F1 through F12 may perform their alternate function by default (e.g. turning on Bluetooth or changing the volume) without the need to press the Function (Fn) key simultaneously. In this case, pressing the Fn key is necessary to get these keys to act like an F key. Although functional, this is not practical for routine Dynamo usage. Instead, consult the documentation for your computer to see how to permanently reverse this behavior. The setting to be changed is typically located in the BIOS or possibly within the manufacturer's Settings application on the operating system (such as Windows 10).
Lists and Grids
Lists
Dynamo often presents options available to the operator as lists. The Sales Order Processing (SOP) menu in the image below—or any Dynamo menu for that matter—is a prime example of such a list. Other examples are those automatically presented by an application, displayed in response to the operator touching the F2 key, or displayed after the operator makes an entry that is not in the list of valid entries. Regardless of a list's origin within Dynamo, the method of navigating it using the keyboard is fairly universal and outlined below.
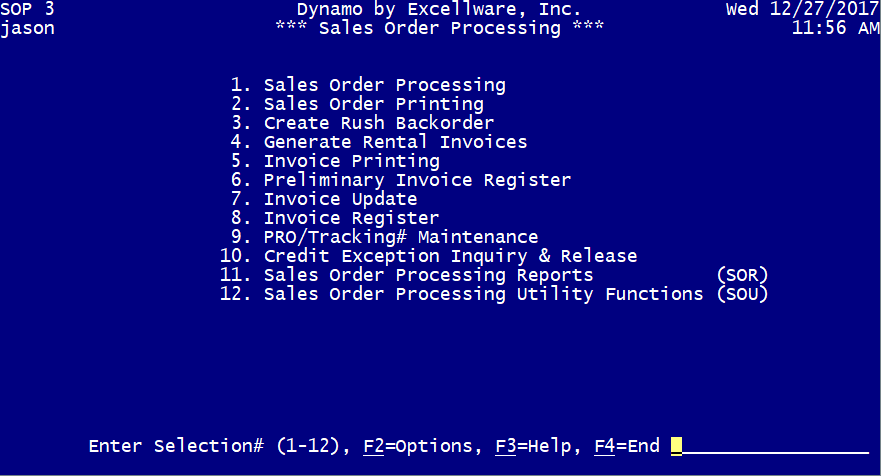
In the example presented in the above image, the user has a list of 12 selectable options on the Sales Order Processing (SOR) menu. There are also a couple different ways with which to select one of these options. The user can
- enter a number—from 1 to 12 in this particular case—corresponding to the desired selection and pressing the Enter key.
- use the ↓ and ↑ arrow keys to highlight the desired selection, then press the Enter key.
- key in the menu code—typically 3 letters within parentheses at the end of a menu option—and press the Enter key. Not all options have menu codes, but in the image above options 11 and 12 can be accessed by typing SOR and SOU, respectively, and pressing Enter.
- touch the F4 key to return to the previous menu or screen.
Grids
In addition to simple lists, Dynamo often presents records in a grid format. You can easily identify a grid format by the vertical grid lines that separate the columns. An example list in grid format taken from Item Inquiry is shown below. Navigating a grid is nearly identical to navigating lists, with the additional use of the ← and → arrow keys to navigate between columns.
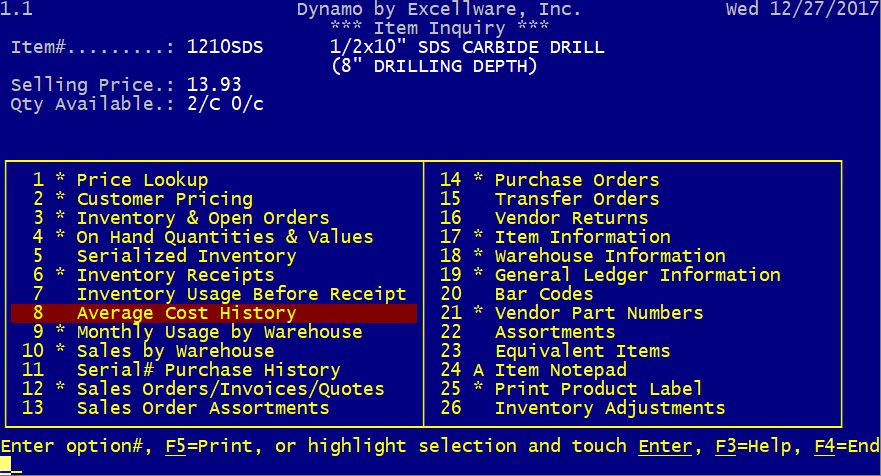
Table 1. Alternate keys and key combinations for Dynamo data entry and navigation. The Function keys, F1-F12, and Shift+F1-F12 work as described below assuming the operator has not changed them from their default settings using Terminal Function Key Maintenance (SMC).
| Cursor Motion with field | Normal Key | Ctrl + Key | Note |
|---|---|---|---|
| Move cursor to right one character | ArrowRt | Ctrl + L | |
| Move cursor to left one character | ArrowLf | Ctrl +V | |
| Move cursor to first character | Home | Ctrl + P | |
| Move cursor to last character | End | Ctrl + E | |
| Move cursor to first letter of next word | Tab | Ctrl + I | When at the end of the field, the Tab key acts like Enter to simulate the way forms on web pages work. |
| Move cursor to first letter in current or previous word | Shift + Tab | Ctrl + B | The Shift + Tab key does not function on most workstations. |
| Inserting & Deleting | Normal Key | Ctrl + Key | Note |
| Toggles between Insert & Overlay Modes | Insert | Ctrl + Y | In Insert Mode, characters are inserted at cursor. In Overlay Mode, characters typed replace character in that position. |
| Deletes character at cursor | Delete | Ctrl +T | |
| Deletes character to left of cursor | Backspace | Ctrl + H | Overlay Mode only |
| Moves cursor left one character, then blanks out current character | Backspace | Ctrl + H | Insert Mode only |
| Inserts blank at cursor position | F12 | Ctrl + Z | |
| Inserts 8 blank characters at cursor position | Shift + F12 | Ctrl + W | |
| Deletes all characters from cursor to end of field | Shift + F10 | Ctrl + G | |
| Deletes all blank characters from cursor position to the first non-blank character | Shift + F9 | Ctrl + U | Cursor must be on a blank character |
| Restores last deletion | Shift + F1 | Ctrl + R | Similar to a Paste. Switches to Insert Mode if in Overlay Mode. You can delete in one field, and restore in another. You can paste multiple times if desired. |
| Moving to Next/Previous Field | Normal Key | Ctrl + Key | Note |
| Accept field and proceed | Enter | Ctrl + M | Tab can also be used when the cursor is at the end of the field. |
| Accept field and move to previous field | ArrowUp | Ctrl + K | This option is program dependent, and does not function in all applications. |
| Accept field and move to next field | ArrowDn | Ctrl + L | This option is program dependent, and does not function in all applications. |
| Restores field to it's original value | Escape | Ctrl + [ | Useful if you have made changes to a field such as deleting more than intended. |
| End or Exit | F4 | Ctrl + _ | Underscore |
| End or Exit | PageDn | Ctrl + N | The F4 key is often a left handed key, so PageDn, a right handed key, also acts like F4 in all situations where PageDn has no other defined purpose. |
| End or Exit | End | Ctrl + E | The End key is also a right handed key that can be used instead of F4 when the entry field is empty. Otherwise the End key moves the cursor past the last character in the field. |
| Other Special Keys | Normal Key | Ctrl + Key | Note |
| Hotkey | F1 | Ctrl + \ | The hotkey is used to temporarily run another application or menu, and upon exiting, return to the same place in the current application. |
| Display options | F2 | Ctrl + ] | When there is a list of valid options that can be entered, the prompt will often include the phrase: F2=Display. You can touch just the F2 key to display all options, or in some cases enter some characters followed by the F2 key to display the options that follow alphabetically the characters entered. |
| Help | F3 | Ctrl + ^ |
Display various help options including: Item Level Help - Displays Help information specific to the field being entered, such as a customer number. Menu Level Help - Displays Help information specific to the current menu, such as Sales Order Processing. Data Entry Help - Displays this page. Rules for Entering Dates - Displays Help information specific to entering dates. Note: When using a PC with Facetwin, it is necessary to check the box named Enable Run Program Escape Sequences in the Facetwin properties in order to display the Help information in the browser. |
| Abort operation | Shift + End | Ctrl + C | You often need to use the Ctrl + C keys, since the Shift + End combination keys do not function on most terminals. |
| Redisplay screen | Ctrl + XR | Need to hold Ctrl down for both the X and the R keys. |