
Accounts payable payment Processing
|
Manual Payment Entry |
Last Revised: 03/07/23 |
Manual Payment Entry is used to enter the following transactions:
-
Print one or more checks quickly
-
Record a payment that does not require a printed check, such as a payment made online, or a payment that was automatically deducted from your checking account, or a hand-written check
-
Reverse a previously updated payment
-
Void a check not used
-
Transfer funds from one of your bank accounts to another, either by check or online transfer
-
Credit a Customers Account for customers that are also vendors
-
Import an automated payment such as one made by a payroll service by importing a spreadsheet file
If you only have a few payments and invoices to process in a day, the Manual Payment process consisting of Entry, Register and Update are typically easier to use than A/P Invoice Data Entry, Register, and Update to record invoices and Payment Selection, Maintenance, Check Printing, and Update.
Manual Payment Entries are grouped into batches. Multiple batches may be opened at the same time if necessary. All transactions within a batch must have a payment date within the same G/L accounting period. All combinations of entry types are permitted within the same batch.
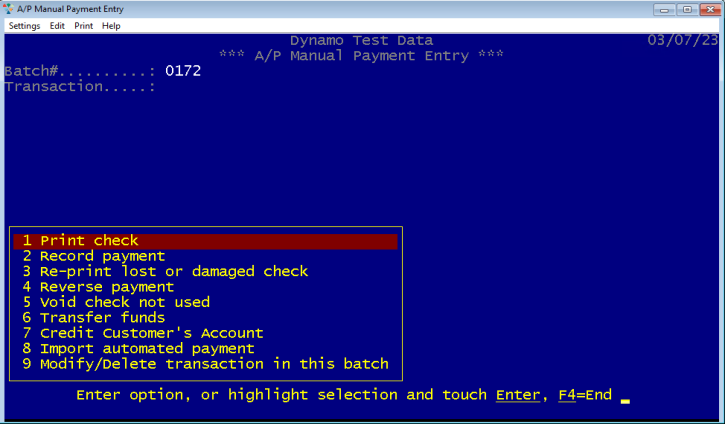
- Print check
- Record payment
- Re-print lost or damaged check
- Reverse payment
- Void check not used
- Transfer funds
- Credit Customer's Account
- Import automated payment
- Modify/Delete transaction in this batch
Print check
This option is used when it is necessary to print a single check quickly. You can print a check for existing invoices previously entered using Invoice Data Entry or for new invoices not yet entered.
| Vendor |
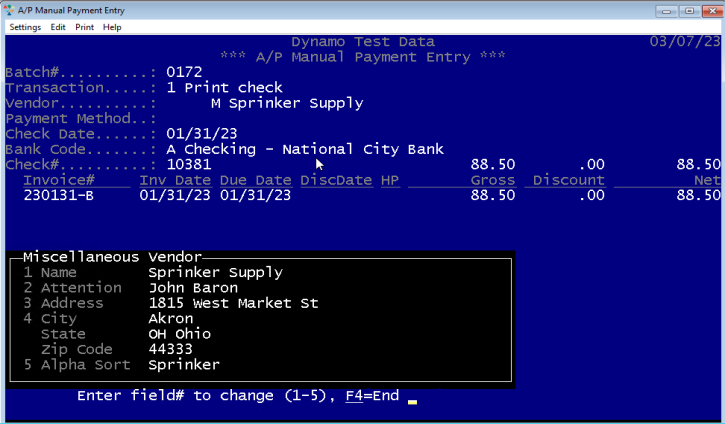
Select the vendor to be paid by entering the Vendor#, a few characters of their alpha sort name, a contact name, contact email address, phone#, or zip code. Checks can also be printed for Miscellaneous vendors. A Miscellaneous vendor is one the you do not want to set up as a permanent vendor using Vendor Maintenance. A vendor must be previously defined in Vendor Maintenance using a single character Vendor# such as "M" or "C". When a check is printed for a Miscellaneous Vendor, you will be prompted to enter the vendor name and address. You can also select the name and address from prior invoices for this vendor. |
| Payment Method | Remains blank for this option, indicates that a check will be printed |
| Check Date | Just touch enter to accept today's date or enter the date to print on the check. Note that all checks in the batch must be within the same G/L accounting period. |
| Bank Code | Select from list of active bank codes established using Bank Code Maintenance (APU). |
| Check# | Just touch enter to accept the next unused check number, or enter the actual check# preprinted on the check to be used. |
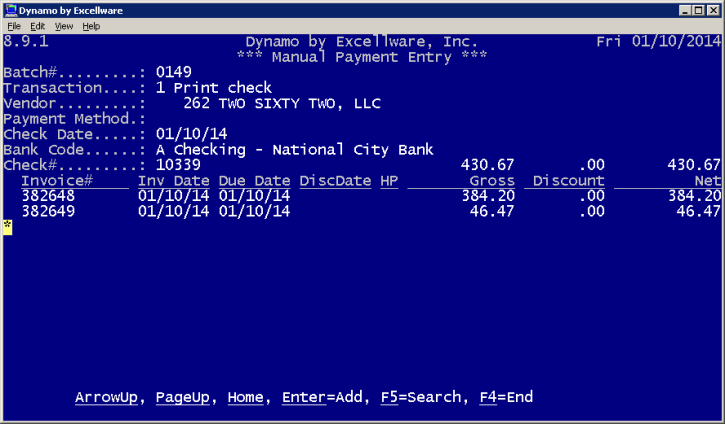
| Invoices | If the vendor has any open invoices, then there will be an option to "Select existing invoice for payment" as shown in the screenshot below. You can also create a new invoice right here within A/P Manual Payment Entry. Entering invoices using A/P Manual Payment Entry is the quickest way to record invoices and pay a vendor, especially when you only have a few vendors to pay that day. |

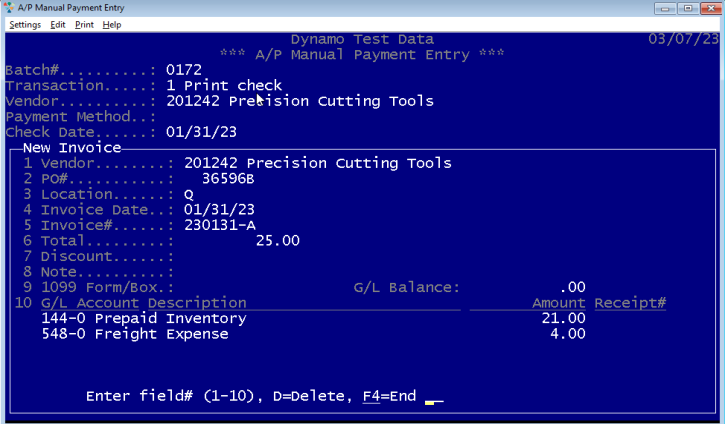
The following fields will be entered when recording a new invoice for payment.
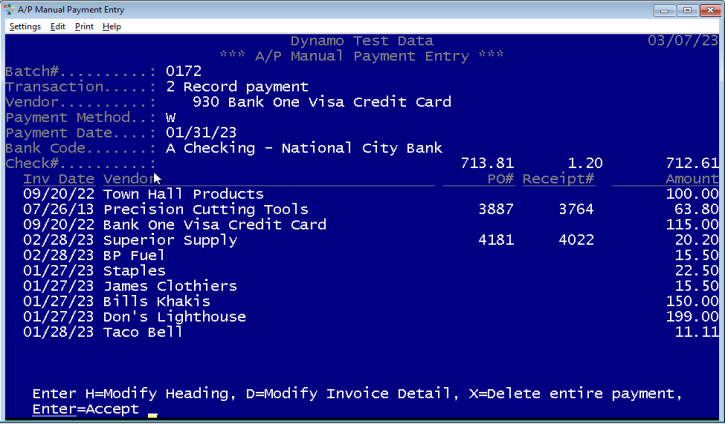
| Vendor | When the payment vendor selected above, has one or more vendors that have the payment vendor specified as the A/P Vendor (in Vendor Maintenance, Accounts Payable Options), then you will be prompted to select the vendor where the purchase was made. This is most frequently used when paying a credit card company. Refer to the "Credit Card Purchases" for more details. |
| PO# |
All inventory purchases require a purchase order number, and the purchase order must have been previously entered using Dynamo Purchase Order Processing. |
| Receipt# |
If any products on the purchase order have been received, then the receipt information will be displayed. Select the appropriate receipt from the list. If there have not yet been any receipts for the purchase, then you can record this invoice and distribute the invoice to prepaid inventory. |
| Location | If you have multiple warehouse codes and your General Ledger Account numbers have a segment designating the location, then enter the location from the list. |
| Invoice Date | Enter the date of the purchase. It must be the same or before the payment date entered above. |
| Invoice# | Enter the Invoice# or other transaction number, or accept the Dynamo generated default Invoice# which is based on the Invoice Date. |
| Total | Enter the total purchase amount including any shipping or handling charges. |
| Discount | If this invoice is eligible for a Cash Discount if paid by a certain date, then enter the Discount Amount here. |
| Note | You can enter any short note to better describe the invoice here. These notes will appear on the printed check stub. |
| 1099 Form/Box | If this purchase should be included on a 1099 Form for the vendor at the end of the year, then enter the form type and box number here. These values can also be saved in Vendor Maintenance, Accounts Payable Options so that they appear as the default values as all new invoices are entered. |
| General Ledger | Distribute the purchase to one or more general ledger accounts. These are typically expense accounts, but can also be assets for depreciable assets such as furniture, vehicles, or other large ticket items. For received inventory, the general ledger account should be Unvouchered Receipts, and a receipt number is required. For inventory not yet received, the general ledger account should be Prepaid Inventory, and a receipt number is not applicable. The general ledger account number and receipt# is typically displayed automatically. You will need to add another G/L distribution when there is shipping, handling, duty or other charges. Note that the value of the merchandise received, as recorded in Purchase Order Receiving must match the unvouchered receipt amount. If these amounts are not the same, then you can distribute the variance to Cost of Sales if the products have already been sold, or use Vendor Invoice Reconciliation to revise the inventory cost of the product received that differ from the cost shown on the purchase order. |
Example of a payment to a Miscellaneous vendor.
Example of a payment to a credit card company.
After all invoices to be paid have been selected or created, select the printer where the check will be printed. If the printer is not listed, you can print to a pdf, then print to a local printer from the pdf viewer. Typically you place a small stack of checks, face up in the fold-down tray of the printer, with the lowest pre-printed check# on top.
Contact Excellware if you would like to have your local printer added to the printer list, to obtain a quote for an inexpensive Brother laser printer, or to purchase pre-printed checks that are compatible with Dynamo.
Record payment
This option is used to make a payment when a printed check is not required. This would include recording a handwritten check, recording a payment made online, or recording a payment that was automatically withdrawn from your bank account.
| Vendor | Select vendor as described above in 'Print check' section. | ||||||
| Payment Method |
|
||||||
| Check or Payment Date | Just touch enter to accept today's date, or enter the actual payment date. Note that all payments in the batch must be within the same G/L accounting period. | ||||||
| Bank Code | Enter Bank Code or select from list of active Bank Codes established using Bank Code Maintenance (APU). | ||||||
| Check# | Enter the Check# from a hand-written check, or when making a payment using an online banking service, enter the check# assigned by the bank when applicable. |
The process to select an existing invoice or create a new invoice is the same as described above when printing a check.
Re-print lost or damaged check
This option is currently under construction. You can re-print a lost or damaged check using Check Printing on the APP menu.
Reverse payment
If a manual payment has not yet been updated, you can delete the payment which will also delete all newly created invoices linked to that payment.
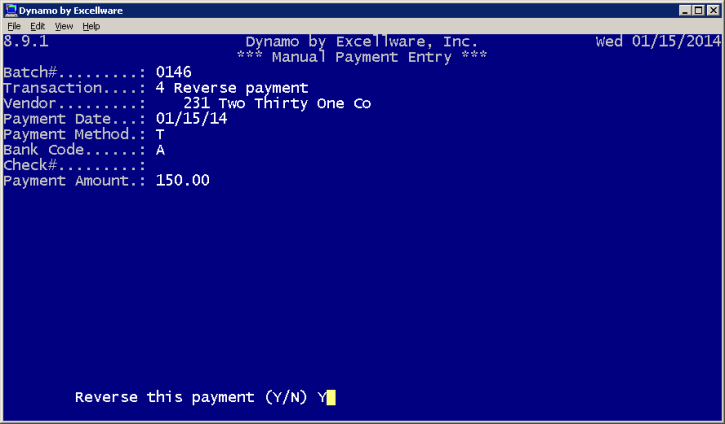
Use this Reverse Payment option to reverse a payment that has been updated by either Check Update or a Manual Payment Update. Note that you cannot reverse a payment that has already cleared the bank using Bank Reconciliation.
You might need to reverse a payment if:
- an invoice was paid to the wrong vendor,
- you have stopped payment on the check,
- you have decided not to mail the check after it was printed and updated,
- some other error was made recording a non-check payment.
Once a payment is reversed, any invoices paid will be re-opened and can be paid again later. Use A/P Invoice Data Entry to adjust or reverse completely any invoices on the payment.
Note that Vendor Inquiry (A/P Checks option) will show the original payment as well as the reversed payment, coded with an "R" in the Pmt column for Reversal.
Void check not used
Use the Void Check option:
-
If a check is mis-printed, for example, if the printed check number does not match the check number pre-printed on the page,
-
if the printer misfeeds and pulls two checks in at one time,
-
a check payment was deleted after printing the check, or
-
a check is not used due to a spill or other damage.
Voiding a check has no financial implications. It is only used to ensure that every check# has been accounted for.
Transfer funds
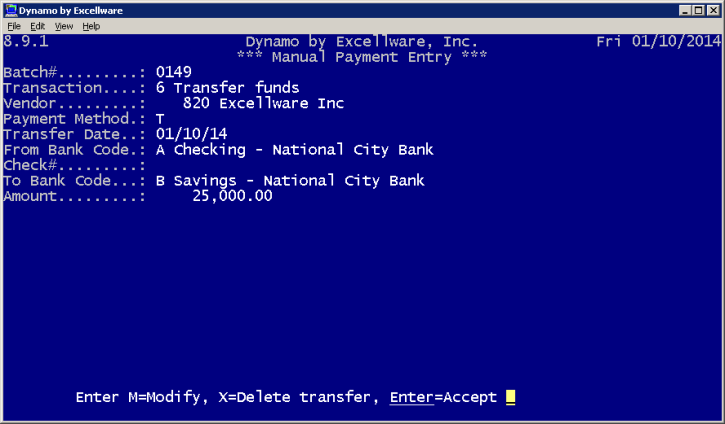
This option is used to transfer funds from one of your bank accounts to another.
You have the option to print a check, or to record a funds transfer made online.
| Vendor | Select a vendor with your company name or the name of the financial institution. Create a vendor with your name in Vendor Maintenance if necessary. | ||||||
| Payment Method |
|
||||||
| Transfer Date | Just touch enter to accept today's date or enter the date to print on the check. Note that all payments and transfers in the batch must be within the same G/L accounting period. | ||||||
| From Bank Code | Enter or select from list of active bank codes where the funds will be withdrawn. | ||||||
| Check# | If the Payment Method is blank, then just touch enter to accept the next unused check number, or enter the actual check# pre-printed on the check to be used. | ||||||
| To Bank Code | Enter or select form list of active bank codes where the funds will be deposited. | ||||||
| Amount | Enter the amount to transfer. |
Import automated payment
This option is used to record a payment where you have payment data in a file, such as what might be provided by a payroll service. Since a payroll posting often includes many G/L account numbers and amounts, importing a payment from a file can save time and reduce data entry errors.
The import file can be a comma delimited (csv), tab delimited, or Microsoft Excel formatted spreadsheet file. You will be prompted to browse for the file on your local computer for uploading to the Dynamo server. In some cases the contents of the file is not compatible with Dynamo, but can be converted to a compatible format. Contact Excellware and provide a sample file for evaluation.
Prior to importing a payment for a vendor, use Vendor Maintenance to specify the import column letters that will contain the G/L Account# and Amount. You may also specify the Payment Date column, and optionally a Payment# column, useful when the file contains multiple payments, such as a payroll file that has one payment for net checks on one date, and taxes on another. See Vendor Maintenance, Manual Payment Import view for additional details.
| Import File Contents | |
|---|---|
| G/L Account# | The Dynamo G/L Account# with or without hyphens. |
| Amount | Positive amount indicates debit to the general ledger, negative indicates a credit. The sum of all the amounts for each payment need to add up to zero. |
| Payment# | Up to 3 characters or digits. Only required when the import file contains multiple payments. For example, if the payroll service makes two separate withdrawals from your bank account, then each withdrawal should have a unique payment#. These could be N for Net Pay, T for Taxes, or 1 and 2, or any other identifier to identify the payment. |
| Payment Date | Optional. If provided it can be in MM/DD/YY or MMDDYYYY or YYMMDD or YYYYMMDD format. If not provided, the operator will be prompted for the payment date. |
Note that Dynamo determines the bank account based on the G/L Account linked to the Bank Account in Bank Account Maintenance (APU). The operator will be prompted should multiple active bank accounts be linked to the same G/L Account#.
You have the option to delete the imported data file after a successful import.
The following error message can occur during the import process. Open the import file using Microsoft Excel or Open Office to correct the date in the import file if required. Contact the creator of the file should permanent corrections be required.
| Import Error Messages | |
|---|---|
| Row xxx contains yyy columns but requires zzz columns | Row xxx does not include sufficient number of columns to obtain the data. |
| Row xxx contains invalid G/L Account# of yyyy. | The G/L Account number is all blank, all zeroes, contains a blank, or is longer than 9 digits, excluding any dashes. |
| Row xxx has an invalid payment# of yyyy. | If used, the payment# must be 3 or fewer characters. |
| Row xxx has an invalid payment date of yyyy. | If used, the payment date must be one of the formats shown above. |
| Row xxx has an invalid amount of xxxxx. | Negative amounts must have a leading - sign. |
| Row xxx has a G/L Account# of yyyy that is not on G/L Accounts File | Either the G/L Account# in the import file is incorrect, or needs to be added using G/L Account Maintenance (G/L). |
| Row xxx has a G/L Account# of yyyy that is not on G/L Locations File | For companies with multiple locations, the segment of the G/L Account# that contains the Location, this error message indicates the Location is either incorrect or needs to be added using G/L Location Maintenance (GLU) |
| The sum of the amounts of one or more payments do not add up to zero. | The sum of the amounts of each payment must add up to zero. |
| No G/L Account was found that is linked to an active bank account. | The import process posts a payment to a bank account as determined by the G/L Account#. Verify that the G/L Account# linked to the bank account using Bank Account Maintenance (APU) is correct and contained within import file. |
| Payment contains multiple G/L Accounts that are linked to a Bank Code. | There can only be one G/L Account per payment that is linked to a Bank Code. |
Credit Customer's Account
You may have some companies that you both buy from and sell to. Use Vendor Maintenance, Accounts Payable Options to specify the Dynamo Customer# for any vendor that is also a customer.
If you have invoices from the vendor, you could print them a check or use your online banking service to send them a check. But if the company owes you more money than you owe them, you can use this option to record a payment which is posted as a credit to the customer's account instead.
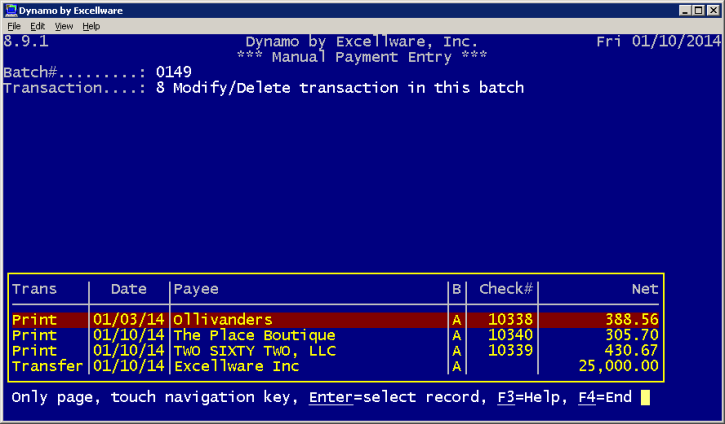
Modify/Delete transaction in this batch
Once any of the above transactions are made, use this option to modify or delete a transaction prior to updating.
After all Manual Payment entries have been made, print the Manual Payment Register and review for accuracy. Return to Manual Payment Entry to make any corrections required. Once the Manual Payment Register is correct, use Manual Payment Update to update all transactions in the batch. Note that if you are reversing any payments, they must be updated before repayment.